About us

Campus Crops is a student run urban gardening initiative at McGill University's downtown campus. We want to grow food on campus, by students, for students. We have been running garden behind the School of Environment building at 3534 University since 2007. In 2009 we started a terrace garden behind the James Administration building. We're really excited to keep improving these two spaces, and need lots of helping hands for the summer ahead! Get in touch and get gardening!

Saturday, June 8, 2013

For the love of potatoes

You've built your potato box (properly). Your potato seedlings are ready. Then what?

The best time to plant potatoes is from mid-March to mid-May, when the soil has reached a temperature of 16°C. Plant the each potato seedling about 12-14 inches (30-45 cm) apart. If you're working with a potato box, add enough soil to completely bury the potatoes. In a garden, you can dig a trench (or individual holes) about 30 cm deep and put just enough soil to completely bury the potatoes (don't fill the trench or holes to the top yet). In both cases and if working with potato seedlings, make sure the shoots are facing upward, and make sure not to break them while burying the seedings.

Make sure that the potatoes are planted in a full sun area (at least 6 hours of sun a day), and keep the soil moist but not waterlogged. If the soil gets too dry, there will be hollow areas inside the potatoes, but if it's too wet, the potatoes will rot. Potatoes should be planted in a soil with good drainage (sandy to loam, clearly not clay), otherwise they will most certainly rot.

Once the plants have reached about 30 cm in height, add 20-25 cm of soil around the plants, either from between the rows in a garden, or from elsewhere if using a potato box. If in a garden, the initial "hilling" will most likely consist of completely filling back the trench or holes to ground level. Hill again once the plants reach another 20-30 cm in height. Repeat until plants are dead, in September or October when it gets colder (if they die earlier, it may be because the potatoes are rotting).

Potatoes do not compete well with weeds, so keep their environment weed free throughout the season. You may also want to remove any flowers if the plant blossoms.

Here's how our planting went:

Since our potato box will be sitting on concrete all summer, we added some left-over rocks we were using for our containers at the bottom of the potato box. We added about 10 cm. That should not be necessary if the potato box is a few centimeters above the ground, or if it's placed in the garden. In fact, we're not even sure if it was necessary in our case, since our soil is of good quality and should drain easily, but we did it anyway.

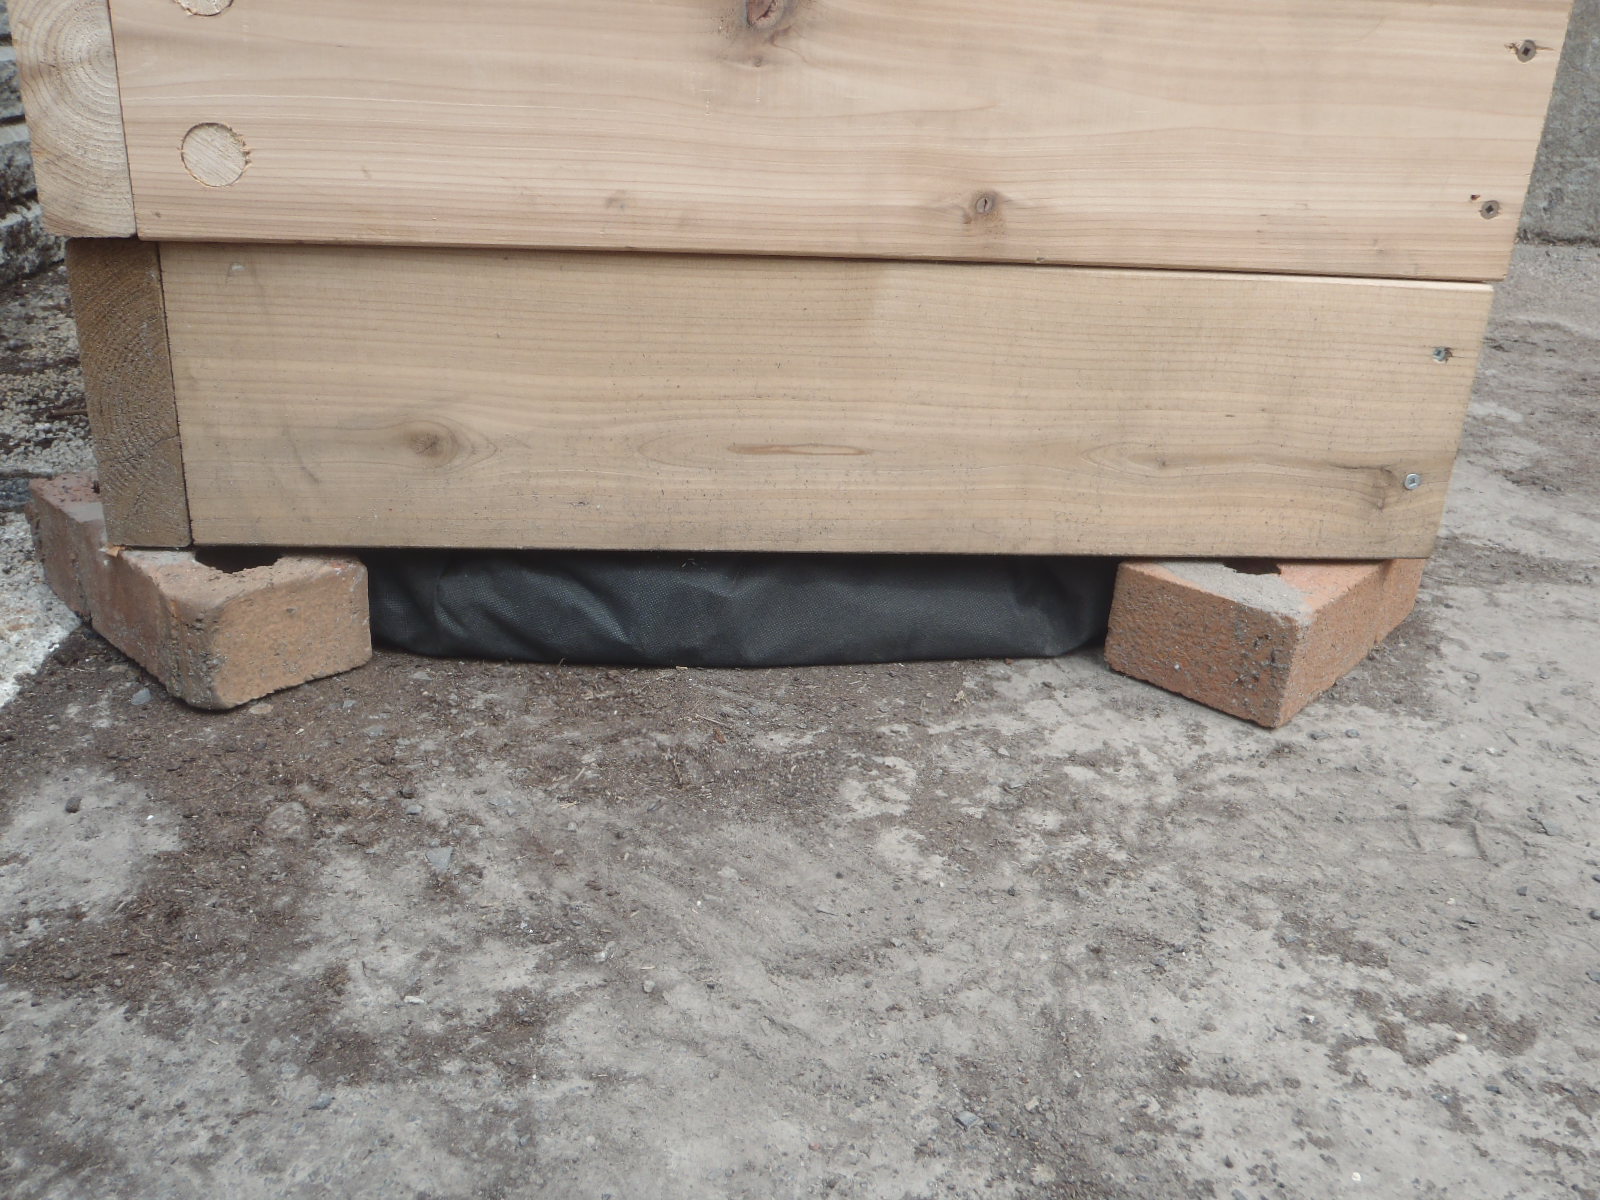
Our potato box has been lifted from the ground with bricks in order to keep the wood well aerated and prevent rot. We didn't have anything to keep the soil from touching the ground, though, so that's why we added rocks.

We then added another piece of geotextile over the rock layer and filled the potato box with about 15-20 cm of soil. We'll probably keep on putting geotextile to prevent the soil from touching the wood, as wood-soil contact may accelerate wood decomposition.


Then we dug the holes and placed the seedlings.


And finally filled the holes.


Some of our seedlings seemed to have started developing leaves at the end of some shoots, so we left those sticking out of the ground. It might not have been a good idea, as three days later the leaves seem to be dying. We're not sure if that's because it's been rainy and the soil is too wet, if the quite cold temperature shocked the seedlings and/or the leaves during transplantation, if we should have buried the whole seedlings, or if it doesn't matter. Time will tell.


Thursday, June 6, 2013

Step by step how to make your own self-watering container (plastic reservoir method) with pictures!

Because it's good to know, here's one of the multiple ways you can make your own self-watering container. This method has the advantage of being both cheap and homemade, yet doesn't make the container as heavy as with the rock reservoir method.

What's a self-watering container, you ask? Well, self-watering containers do not literally water themselves, but they do help water plants less often.
The principle is quite simple: water is poured down a pipe directly in a water reservoir, sitting under the soil. There, a wick takes the water from the reservoir to the soil. As the plant(s) use the water made available to them in the soil, the wick takes more water from the reservoir to the root zone of the plant(s). In some way, the plants water themselves (but they don't, also, you know).
Source: http://cache.gawkerassets.com/assets/images/lifehacker/2009/03/2009-03-30_113406.png

You'll need:

- a plastic container that will offer enough space for a decent-sized water reservoir and the roots of your plant, often at least 30 cm in width, length and depth for vegetable crops; check up the spacing requirement and soil depth needed for the plant(s) you want to grow in your container if you're not sure what size you need
- a sealant (maybe)
- plastic boards
- PVC pipe, about 1 inch diameter
- geotextile, as cheap as you can get
- perlite
- good soil
- compost (maybe)
- something that cuts
- a saw
- a drill or something to pierce a hole through hard plastic


The plastic we use for this model is Coroplast, which you can probably find at your local hardware store, or at your local deputy/MP/whatever office not long after an election period (or in the streets during the election period, but this is not usually recommended and Campus Crops doesn't suggest you do it either oh heeeellll noo!). Other types of plastic can work too, but they need to be both quite rigid, while being soft enough so you can cut them quite easily. 

PVC pipes, geotextile, perlite and soil can all be bought at a hardware store too (don't ask your MP for those, though).

Anywho, let's unleash them pictures.

THIS IS IT


1) No matter what type of container you use, make sure it's watertight near the bottom, and drill an overflow hole anywhere between 7-15 cm from the bottom of the container, depending on the size of said container (you want as much soil as possible in there, but too much soil for too little water won't help either). If your container is not already watertight, we suggest using this sealant, or any other sealant that works in water, works with plastic, and is not toxic. Extra points if the product description mentions that it's safe for sealing aquariums (aquaria? whatever, if it's good for the fish, it won't poison your vegetables).

2) Cut your plastic into strips that will fit lengthwise and widthwise. For the width of the strips, see step 3. Calculate you'll need a strip every 20-25 cm in both directions (lengthwise and widthwise) at the bottom of your container. Cut slits into the strips where they will intersect with other strips.


3) Arrange the strips into a grid pattern at the bottom of your container. An important thing about the width of the strips is that the grid must be about 1 inch (2.5 cm) above the overflow hole you pierced in your container. This is to ensure a good airflow in the soil and the reservoir even when the latter is full of water. Otherwise, expect anaerobic conditions, pathogens, diseases, death, and the four horsemen of the apocalypse.

Fits perfectly!


4) Cut another piece of plastic to cover the bottom of your container. Put it over the grid. Voilà! That's your reservoir! 

Some people like to leave the corners uncovered, either to use them at wick (more about this later), or to put the PVC pipe. If you don't want to do that, make sure you cut out a hole somewhere to insert your pipe.

Fits perfectly!
5) Saw your PVC pipe. Make it long enough to stick out of the container by a few inches. Saw an end at an angle, otherwise it may lay flat on the bottom of the container and water will stay stuck in the pipe instead of going into the reservoir. Insert the pipe in a corner or along one side of your container.


6) Make a wick. A wick is something that will get the water from the reservoir to the soil (by capillary action), to make it accessible to the plant. Without a wick, the water would just sit at the bottom of the container and your tomatoes would be like "Meh."

A wick must be 1) about as high as your reservoir, 2) durable, and 3) full of small holes (so the water can get in easily but the wicking material doesn't get out).


7) Cut out a hole for your wick.


8) Cut a geotextile piece that is about 5-10 cm wider and longer than your container. Cut a slit in it and insert your wick. Make sure you cut the slit vis-à-vis the hole for the wick in the container. Put the wick in the hole in the container and lay the geotextile so it extends a bit on each side.


9) Put enough soil in your container to fill your wick. Mix in some perlite (about a fifth of the soil you added).  Dump the mix into the wick. Perlite helps keep the soil light and well aerated, which various macro-organisms normally do in the ground. If perlite and soil are not mixed together before being added to the wick, it can be quite hard to make sure the wick contains a good mixture of both when the container is full. 

If you prefer to mix your soil and perlite before adding them to the container, skip this step.


10) Fill the container with soil and top with perlite. Make sure to keep the geotextile on the sides as you fill the container with soil. Mix thoroughly the soil and perlite. What we're looking for here is the unfamous reversed-color chocolate chip cookie dough mix, where the perlite would be the white chocolate chip and the soil would be the chocolate cookie dough.

If you have "weird" chocolate chip cookie tastes (not sure there's a standard or anything about what is a correct cookie dough-to-chocolate chip ratio), go for 4 parts of soil per part of perlite, or 20% perlite.


Put in the oven at 350F for 20 minutes and enjoy!


Radical Montreal - Urban Farming in Montréal

Here's an awesome list of pretty much all the urban agriculture initiatives in Montréal, made by Sheena from the Radical Montreal blog. The blog is a great resource to stay abreast of all workshops and events of all kinds happening in the city.


Montreal Urban Agriculture Projects

ROOFTOP GARDENS

Concordia Greenhouse
-Vermicomposting
-Greens, microgreens production
-Greenhouse plant propogation
-Workshops
www.concordiagreenhouseproject.wordpress.com

Lufa Farms
-Hydroponics/Window Farming/ Weekly CSA program
http://lufa.com/en

Santropol Roulant
-Vermicomposting, urban gardens, workshops
-Urban Beekeping
-Rooftop garden 
http://santropolroulant.org

Alternatives Rooftop Garden Project
-Four active garden projects
http://www.alternatives.ca/en/project-campaign/montreal-rooftop-gardens-project

SCHOOLYARD GARDENS

City Farm School
-Urban gardening/farming internships
http://concordialoyolacityfarm.wordpress.com/

Mackay Gardens
-Downtown raised bed planters
http://sustainable.concordia.ca/working-groups/concordia-greenhouse/projects/mackay-garden/

Loyola Campus
-Gardens
-Workshops
http://concordialoyolacityfarm.wordpress.com/loyola-farm/

Campus Crops
-McGill University campus garden, workshops
 http://campuscropsmcgill.blogspot.ca/

UQAM - Crapaud
 Garden
-Campus community garden, workshops
http://www.crapaud.uqam.ca/?page_id=6

Edible Campus
 -Campus based gardens
-Urban Beekeeping 
http://www.mcgill.ca/mchg/projects/ediblecampus/ 

COMMUNITY GARDENS

Action Communauterre 
-Community Gardens
-Workshops
-Hosts Seedy Saturdays annually
http://www.actioncommuniterre.qc.ca/

La Ruche D'art Garden
-worskhops
-demonstration garden
 https://www.facebook.com/pages/La-Ruche-dArt-St-Henri/174341355959676

City of Montreal Community Gardens
-Gardens in 18 boroughs for community use
-In some boroughs, a gardening instructor visits the garden regularly to give advice to gardeners. Some boroughs offer adapted gardens for persons with reduced mobility. 
-Materials provided include soil, a water source, tool shed or toolbox, tables, fences, sand, paint and flowers.
 http://ville.montreal.qc.ca/portal/page?_pageid=5977,68887600&_dad=portal&_schema=PORTAL

COMMUNITY RESOURCES

Éco-quartier
-With locations situated throughout Montreal, these local centres offer:
-Annual neighbourhood clean-up
-Distribution of recycling bins, composters, rain-barrel collectors and often plants.
- Education, such as natural pesticides, and environmental sustainability
http://www.ecoquartier.ca/index.php?option=com_content&view=article&id=37&Itemid=42

Montreal Permaculture Guild
-Community group, discussions, fb board
http://permaculturemontreal.org/
http://www.facebook.com/groups/66201097563/?bookmark_t=group

Agriculture Urbaine
-Group hosting events, seminar, discussions 
http://www.ecoleagricultureurbaine.org/index.html

Le Groupe de travail en agriculture urbaine (GTAU) 
-Official group who hosts events, seminars 
http://www.agriculturemontreal.info/

Radical Montreal Urban Homestead Exchange
-Live-in volunteer exchange, garden, workshops
http://www.radicalmontreal.com/p/urban-homestead-exchange.html

Gardening Network of the Southwest and Verdun
-Community resources, workshops
http://reseaujardin.org/en 

Agriculture Montreal 
-Events
-Information 
http://agriculturemontreal.com/

L’arrondissement d’Ahuntsic-Cartierville :

- un jardin collectif en bacs pour les personnes retraitées de la Porte d’Or des Iles PODI,
incredible edible
-French only

Sustainable Montreal
-Local news in urban agriculture
http://www.sustainablemontreal.ca/tag/urban-agriculture/ 

Montreal Urban Ecology Centre
 -La Ville en vert
-Green roofs
-Imagine Milton-Parc
-School for Urban Citizenship
http://www.urbanecology.net/article/we-sign-urban-agriculture

PAUSE: Production Agricole Urbaine Soutenable
-Projects with container planting, mushroom growing, and bee-keeping. French only. 
https://www.facebook.com/pages/PAUSE-Production-Agricole-Urbaine-Soutenable-et-%C3%89cologique-/137583529654966 

OTHER RESOURCES

The Urban Farmer 
http://theurbanfarmer.ca/resources/urban-agriculture/

Guide to Soil Contamination in the city
http://mse-research.mcgill.ca/envr401_2002/brownfields/guide.pdf

If I have missed any URBAN FARMING resources for Montreal, please let me know!
Sheena.Swirlz@gmail.com


-------------------------
We might add that there is P.A.U.S.E. at the Université de Montréal

Wednesday, June 5, 2013

The beds are ready!

Last Saturday was our (last) garden opening day. After working on some containers, we were also able to make all the beds in our soil garden. Here's the result from many angles. Gardening hours to be announced soon!

All the paths are 45 cm wide (18 in.), and most of the beds are 75 cm wide (32 in.). The oval near the middle is 1m by 1.5m and will host our spiral garden. 


From the South. The central path going from the upper center-right to the oval in the middle was designed to facilitate movement with the water hose, which is plugged into the faucet under the stairs, at the upper extreme-right of the picture.


Tuesday, May 28, 2013

Better late than never!


At last! Finally! Was about time!

We know, we're quite late at the party, but a few things delayed our garden opening this year. We've decided to get things done once and for all this Saturday June 1 at 1pm, rain or shine! The weather will most likely not be perfect, so dress accordingly (at least it's not going to be 7 effing Celsius degrees like last weekend).

During the afternoon, we will assemble the self-watering containers that are not done yet (about a dozen), prepare the beds in the soil garden and, if all goes well, plant. Everyone is invited, especially people who want to be involved in the collective!

For Facebook users, there is a Facebook event.

As an hors-d'oeuvre, a few pictures:

Our new garden, finalized, although there's still a bit of work to do
 around it (none of our concerns, now that we can plant!).

Our dearest japanese knotweed has awoken from its slumber.
It is, unfortunately, quite vigorous.

A nice specimen, about 12 inches high. The little things are taking advantage
of the fact that the area is in renovation and almost impossible to mow.

Our hoop house, doing its thing behind the James Administration building.

The seedlings we got last week from the Vert-ta-ville seedling sale
at the Concordia greenhouse. Doing well despite the less-than-ideal weather!


From left to right, we got cherry tomatoes, tomatillos, parsley, peppers, ground cherries, eggplants, oregano, onions, leeks, and lavender.

The terrace, with the completed self-watering containers along the sides. Since there will be renovations around the drain, near the center, we were asked not to put any container there for the moment.

All of them containers, along with the hoop house, at the far end, and the potato box, right in front of the hoop house.


Update on the potato box

A while ago we made a potato box.

On woodworking


In the meantime, one of our member got told by a friend that our design for the potato box was good, but that screwing in the end grain of the wood (like we did) wasn't recommended. The solution is to add wood plugs perpendicular to the grain so there is some cross-grained wood for the screw to hold onto, which is what we did with our limited skills and equipment.

 For this we used wood dowels of 1" of diameter that we cut into 1½" plugs. A smaller diameter may be better; it probably depends on the size of the screws used. In order to insert those plugs, we needed to drill the holes, so we used a hand drill with a 1" spade drill bit...

Here's the beast.

...although the only bit we had at hand had a very long shank and was a bit overkill for the job (and potentially dangerous, quite frankly). A drill press would have been ideal for this kind of work, especially since drilling a 1" wide hole in cedar is quite demanding and can exhaust the battery of a hand drill quite rapidly.


But first, in order to make sure we'd drill as straight as possible (and at the right place), we drilled pilot holes where the center of the larger holes would be.

The pointy tip of the spade bit engaged in the pilot holes, making sure
the bit wouldn't "walk away" when drilling.

Spade drills often make the wood "explode" when reaching the other side, so we only
drilled halfway through on one side, and then finished the work from the other side.

And then bam! The hole wasn't perfect at first, though, so we had to go through it again
with the spade bit to remove bumps that would prevent the wood plug from going through.

And then we could saw the dowel into plugs and insert them in the holes. We're not sure what kind of wood our dowel was, but it clearly wasn't cedar, and probably not hardwood of any sort. This might be a problem for the durability of our potato box. Time will tell.

Here's the dowel, being cut into plugs. You can see pen marks every 1½ inches, because eyeballing everything can result in bad surprises, and using a finger as a standard wasn't very safe.

Bam! The plug wouldn't completely go through by itself, so we
helped it a little bit with the hammer-thing at the top right.

Last step, re-assemble the unit.


Fine observers may have noticed that the screws were not screwed in their original holes. That is partly due to the fact that the wood plugs were not all in the path of the original screw holes, and also because we screwed up (haha!) and put the plugs too far to be reached by the screws we originally used (2½" screws). So we used longer screws and made sure they would go through the plugs.


On potatoes


We forgot to tell you about this earlier, but we have potato seedlings in progress. Although potatoes can be planted as unsprouted tubers directly in the soil, one can get a head start by starting them as seedlings. This is convenient when, like in our situation, planting is delayed.

Potatoes, unlike other crops, can be grown using any potatoes you buy at the store or the market (potatoes from your local farmers' market may do better in your region, though). Beans bought at the store, for example, are treated with some anti-sprouting agent. If you are able to buy dried beans directly from a farmer, though, they should be able to sprout (don't make my word on that, though).

To start potato seedlings, place the potatoes in an egg carton with the scar of the stem at the bottom. If you don't eat eggs, you can place them in anything else that will hold them upright (for example, below, a makeshift cardboard-thing). Place the tubers in a dry, warm and dark place, although a bit of indirect sunlight is not a bad thing.

The cardboard-thing with the potato seedlings. The borders could have been lower, in order to allow better ventilation and exposure to light.

At that point, some suggest rubbing off all the sprouts except the three or four topmost ones to concentrate all the energy of the potato in the production of healthy seedlings, while others suggest to let the tuber be and then, at the time of planting, to cut the potatoes in pieces containing 3-4 sprouts each. You're the boss, applesauce. If you do cut them in pieces, though, make sure to do it a few days before planting, in order to allow the potato flesh to dry; this will reduce risks of rot or diseases.


At Campus Crops, we believe that exposing potatoes to anarchist materials at an early age makes better prepared and tastier potatoes at maturity, hence the flyer at the bottom right reading (roughly translated): 'We don't give a fuck about your elections! We don't vote, we fight!" 


Wednesday, May 15, 2013

Incoming and ongoing seedling sales in Montréal!


Some resources for the gardeners who are looking for seedlings to add to their garden.

Vert-ta-ville seedling sale at the Concordia Greenhouse


Flowers, vegetables and herb heirloom seedlings at 3$ a piece from May 21 to May 24 (or until stocks are exhausted, which tends to happen quite fast).

Find more information in the Facebook event or on the Concordia Greenhouse blog.

Santropol Roulant's Seedling Sale


Come one, come all to the Roulant's Annual Seedling Sale!
On Saturday, June 1st, from 11am to 5pm, we'll be selling the extra seedlings from our greenhouses, all of which have been grown from organic seeds using organic methods. They're perfect for getting your garden off to a good start.
All proceeds from the sale will go to Santropol Roulant's urban and peri-urban agriculture programs. With a couple of exceptions, seedlings sell for $3.50 each, or 3 for $10. Most seedlings have been potted up to 3 1/2 inch pots. 
Here's what we expect to have for sale: tomatoes, eggplants, peppers, basil, parsley, lettuce, shallots, ground cherries, cucumbers, summer and winter squash, and more!
If you'd like to reserve your plants in advance, please email Tim. See you at the sale!

Santropol Roulant is located at 111, Roy east.

Get your seedlings at Coop La Maison Verte


La Maison Verte, in NDG, also offers seedlings that you can order on their website and pick up at their store (5785 Sherbrooke West) every Saturday until June 8.


Greening Indoor McGill First Plant Sale


Annual GIMI indoor and outdoor plant sale!
Friday, June 7th 11-2pm
Downtown campus, intersection of lower fields (between Arts building & Roddick gates)
CALL FOR DONATIONS 

Now that spring is finally here it’s time to think about plants!!  Are any of your indoor office plants getting too big? Do you need to divide your garden perennials?  Are your neighbours and friends tired of accepting your divided perennial “gifts”? Did you start too many tomato plants? We would be thrilled to receive any of them!

The Greening Indoor McGill Initiative is hosting its 1st Annual McGill indoor and outdoor plant sale on Friday, June 7th, 2013 from 11-2pm at the intersection, lower campus fields (halfway between Arts building & Roddick gates). Mark your calendars! Pass the message on!

Find more information on their website.