About us

Campus Crops is a student run urban gardening initiative at McGill University's downtown campus. We want to grow food on campus, by students, for students. We have been running garden behind the School of Environment building at 3534 University since 2007. In 2009 we started a terrace garden behind the James Administration building. We're really excited to keep improving these two spaces, and need lots of helping hands for the summer ahead! Get in touch and get gardening!

Monday, November 12, 2012

Closing the Garden: The dirtiest part of gardening after opening the garden


Welly welly welly welly well, seems like fall has arrived. Time to close the garden! Which is exactly what Campus Crops did on November 3.

What a nice team!  ...and Carl, too, over there.

Closing the garden is a quite crucial step, as the way it is done will determine the quality and compaction of the soil when spring comes. There are also some things that can done at that time if one wants to reduce the risks of diseases for the following growing season. A basic routine for putting a garden to bed consists of about 5 simple steps, namely: (1) uprooting all annuals, (2) cutting back all perennials, (3) amending the soil, (4) mulching the whole thing, and (5) a general clean up of the area (tools, bags of soil, various structures left there).


That's pretty much what we did, but since the soil in our garden is very clayish, we thought we could do a little more to improve it a bit. Clayish soil is, you probably guessed it, a soil that is characterized by a large proportion of clay, compared to the respective proportions of organic matter and sand. Clayish soil drains poorly. This means that it takes quite a long time for water to percolate deep into the soil, which increases the risks of shallow watering and all the bad things that come with it. The converse of draining poorly is retaining water well, so it's easier for the soil to get water-logged and for the plant roots to rot if they sit in water for too long. Clayish soil also cracks and crusts easily when it dries, and, clay being clay, compacts a lot if it's walked too much a lot or if it gets too dry. 

All this amounts to a lot of extra care toward the soil in an environment that is already not so optimal. In order to improve clayish soil, a common method is to mix a lot of organic material into the first 6 inches or so of soil. This increases the proportion of organic matter, and brings the composition closer to that of loam (a well-balanced soil). We could have added sand too, but organic matter enriches the soil, while sand is, well, sand.

It is also possible to improve clayish soil during the growing season with minimal inputs (i.e. instead of hauling half a dozen cubic yards of mulch and compost to the garden): tubers (e.g. potatoes), root vegetables (e.g. carrots) and cover crops with deep taproots (e.g. rye) can be planted. They will break up the soil as they grow, leach nutrients from the deep layers up to the surface and leave some organic matter (their roots) to rot in the soil. That's actually the 'permaculture-approved' method, but it takes a lot of time and effort, and can also demand some sacrifice, like growing nothing but rye for a year because root vegetables and tubers don't grow well in a soil that is too clayish (we had such problems with our root vegetables last year).

Anyway, we decided to get some mulch and compost and turn it into the soil. We got half the compost we used from the city of Montreal and the rest came from Big Hanna, the hot-compost machine on downtown campus.
Getting compost at the city give-away: "Maaaaah!"

Let's focus back on the action. Our plan was quite simple:
1) Arrive at the garden at 1pm.
2) Uproot all annuals.
3) Cut back the few perennials we have (rhubarb, chives and blackberries) and transfer them in pots while we do the rest.
4) Turn, break and level the soil over all the garden.
5) Add a 3-inch layer of mulch and the compost we had.
6) Mix that layer with the turned soil underneath.
7) Cover the whole area with dead leaves in order to avoid extra compaction from the weight of the snow and ice.
8) Call it a day and go eat some vegan chili.
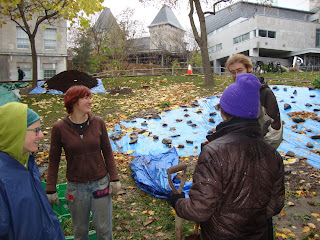
Let's plan shits! We need people, smiles and BLUE TARPS! 
Everything went quite well, aside from the fact that it rained daily during the previous week. Needless to say, the soil was heavy and sticky, though the rain seemed to have softened it a bit. Some lovely and courageous people took a few hours of their day to come and help us; we reached a peak of 9 people around 4pm. It also seemed like we ordered too much mulch, so we couldn't really mix it into the soil because the layer was too thick. Hopefully we'll have a much nicer soil next spring anyway!

Now that we're totally done with gardening until next year, Campus Crops will continue to host various workshops and film screenings throughout the winter. There will be one every month or so. Stay up to date by checking our blog, subscribing to our listserv or sending an email to campuscrops@gmail.com. You can also send us any idea of film you'd like us to screen, or workshop or event you'd like us to host! We also have weekly meetings every  Tuesdays at 5pm in the MUGS Lounge (Burnside, room 305) during which we plan and organize said workshops.

I've said enough, here are more pictures!

Clay, mud and short shovels


"Turning the soil: check! Now we just need to add the mulch and the compost, turn everything into the soil and put some dead leaves over the whole thing. We should be done soon!"
Day 72: Almost done. We finally added the leaves. The night fell a few days ago but the sun never came back. We're running low on food. Fortunately, we can eat the leaves, flowers and roots of the dead plants from the garden. We'll fire another rocket flare tomorrow; hopefully someone will come to our rescue.
(Seriously, though, we finished at 7pm)

Resources for putting the garden to bed:
5 steps to putting your vegetable garden to bed
Putting Your Garden to Bed; Your Best Move for Spring

Wednesday, September 12, 2012

Campus Crops has a zine!!

Oh yeah! And it's marvellous, thanks to Noemi's hard work!

You can get it for printing or for reading on the computer.


Campus Crops Zine Fall 2012 - Web

Yes we can...


By Anarcho-Asperge and Celery Volanas

One of the great ironies of our times is that people who don’t know how to grow food can eat to their satisfaction all year long, while other people, who possess such knowledge but have no access to land, are unable to grow their own food and must live in a constant state of precariousness. It’s become common knowledge that the agrarian methods inherited from past agricultural revolutions are ravaging ecosystems and the land we rely on to feed ourselves. What people don’t necessarily know, however, is how the gigantic system controlling every step of production and transformation of food has also destroyed the lives and cultures of thousands of people and communities across the world. 


Although the main idea behind today’s agrarian practices dates from the mid 18th century, when open-field systems and sustenance agriculture started being replaced by enclosed lands and land ‘improvements’ (from the old French ‘en pros’, meaning ‘for profit’), the so-called ‘Green Revolution’ and later major agricultural ‘improvements’ accelerated the deleterious effects of our agricultural methods. High yielding varieties (HYVs), large-scale mechanization, inorganic fertilizers, pesticides and herbicides (all made from fossil fuels), and more recently GMOs (genetically modified organisms) and factory farming, have contributed or led to greater pollution, increased fossil fuel dependence, climate change, soil exhaustion, loss of biodiversity, and more. HYVs are an excellent example of an ‘improvement’ gone bad. HYVs necessitate more water and fertilizers than do crops suited to their local environment and are grown in sub-Saharan Africa, where water can be scarce and soil easily exhausted. The environment in which modern agriculture is pursued is not necessarily ideal; as a direct result of neglecting the original landscape and its capacities, the application of modern agricultural techniques in these environments is detrimental to the ecosystems.


The constants throughout the agricultural changes outlined above are the commoditization of food, a disregard of ecology, and the imperatives of the capitalist market, namely competition achieved through productivity and economic efficiency. When food (or anything else, really) becomes a commodity, what is grown, who grows it, how it’s grown, and even who gets it doesn’t matter anymore: food is reduced to its exchange-value and the aim switches from feeding people to maximizing profits and supplying demand (of course, only people with money or people part of a money economy count as ‘demand’ in the global market). In order to do this, input costs, like labor- and time-related costs, are reduced and outputs are boosted using some of the ‘competitive innovations’ mentioned above. For example, input costs could be reduced by lowering the workers’ salary or using strong herbicides instead of weeding. The outputs can be increased by using GMOs that store longer on the shelves, allowing for longer transport where the produce might sell at a higher price, or by planting cash crops, which are highly subsidized staple foods that can be sold abroad at a high price. Food is no longer just a sustaining element, rather, it is a source of profit.


The capitalist market economy is tied strongly to food and is tough to escape from, even as an individual. An average person, for example (as much as a person can be ‘average’), will need to eat. In order to do so, they can either 1) sell their labor power on the market, which makes their access to food (through access to jobs to get money) dependent on the market, or 2) grow their own food. If they decide to find a job, the resulting situation of depending on money to feed oneself is a problematic one for most people on the planet. ...So if they can’t buy the food, they should grow it! However, if they decide to grow their own food, they will need land, and land comes at a price. Even if they are able to get enough money together to purchase land, they must pay land taxes annually. In order to keep up with expenses, the farmer will have to abandon sustenance agriculture for market-oriented agriculture in order to make profit. This means they are dependent on the market. Because of their low competitiveness compared to big producers, independent farmers can almost never survive long before having to bow before some agri-business. HYVs, GMOs, and cash crops, along with their flock of inorganic chemicals, become the name of the game in order to stay competitive, otherwise someone else will take your place.


Obviously, something is not working. It seems strange that no one can have access to land for their own needs, unless they participate in the greater market and economy in order to keep their land. And what about the fact that we can’t decide what we grow, how we grow it and where it goes? Food security is not possible when access to food is inevitably mediated by the market. Food sovereignty is as important, if not more important, than food security. Giving communities the opportunity to grow their own food and have control over which crops and agricultural methods they use according to the local climate and needs would alleviate their forced dependence on the countries and corporations of the ever-great Western/dominant world. Maybe we should do this.

People are connected to the land in their lives and cultures, and food plays an important role. The capitalist economy undermines both the society and the environment that form its basis. Capitalism also alienates society from the environment, and is therefore a problem, not a solution. Food-related issues like racism and irresponsible use of ‘resources’ are however not unique to capitalism and have existed before its rise. Still, because it has been built upon and has historically thrived on aforementioned injustices, capitalism is a wall between us and potential solutions: it needs to go.

Tuesday, September 11, 2012

A Bit of Permaculture: Build your own herb spiral


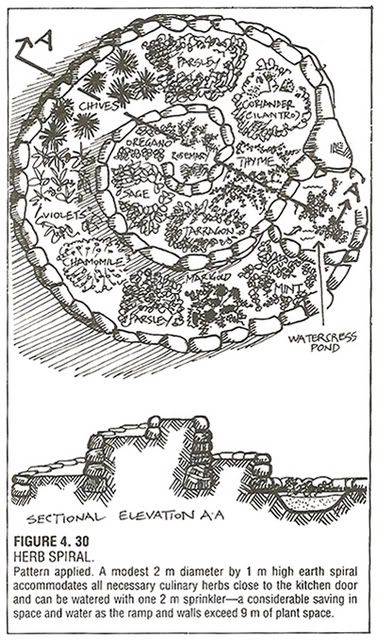
This is 'modest'. You should be modest too.
A herb spiral is a design that makes use of gravity and sun position in order to create multiple ‘microclimates’ that can suit different types of herbs (or vegetable crops or flowers or medicinal plants or all of them, you decide) in a limited space. When water is poured at the top of the spiral, it drains down to the lower layers, creating a dry and sunny habitat at the top, a shady (or not, your choice) and humid zone at the bottom, and different degrees of habitats relative to sun exposure and height between those two extremes. It is normally built out of rocks, bricks or even glass bottles filled with earth that form the structure and retain heat absorbed during the day, reducing drastic temperature variations that could damage fragile herbs.

Aside from it to be compact and versatile, a great advantage of the herb spiral is its suitability for companion planting. This allows an easier integrated pest management, as pest repellant or predator-attracting plants that couldn’t be planted nearby in a level garden because of their different needs can now thrive close to each other. A herb spiral also eases water management, as plants preferring dry soil will be planted where the soil dries quickly, plants that like well-drained soil will live in a soil that will drain nicely even after a big rain, and plants that can grow in wet soil will rarely lack moisture.

How you do it

To build a spiral, first choose a site, about one or two meters wide (or smaller, if you want a small spiral, but this will limit the range of microclimates). It doesn’t matter if it’s on the soil or on a hard surface like concrete or asphalt. The site should receive plenty of sunlight in order to keep Mediterranean herbs (oregon, sage, rosemary, e.g.) happy. Avoid places where water tends to form puddles. If you can find a sunny spot close to the kitchen, it’s even better, as you won’t forget to take care of your spiral and will not be distracted on your way to your spiral (or back to your kitchen).

When you’ve found the right spot, start by laying cardboard and/or B&W newspapers on the ground. This will keep weeds from growing in your spiral. Then, mark the spiral. It can be circular or elliptic; that’s up to you. In order to make sure the microclimates will be in an ideal situation, it’s better to place the bottom end of the spiral towards the North, so the humid zones are the shadiest and do not lose too much water through evaporation.

Remember to clean the bottles beforehand. Plants have some
difficulty tolerating 'certain' substances.
Follow by outlining the shape of your spiral with the building materials you chose. You can build the walls to their full height and fill the spiral afterward, or you can fill it gradually while you raise the walls. For a typical 3 foot high spiral to have a nice slope, its center should be 3 feet off the ground. Cap the bottom end of the spiral with a rock in order to avoid run off, unless you want to make a pond at the bottom.

Some people infill the spiral with straw that they’ll let turn into compost, but most people prefer putting gravel to build the slope, adding the soil at the end, with sand or geotextile between both. Gravel makes a solid base and ensures good drainage, avoiding collapse and waterlogging. Different soil mixes can be added in the spiral to enhance the effect of the microclimates. For examples, the lowest part can be filled with topsoil and compost, making a rich soil that will keep water, the middle zone can be two parts soil and one part sand, for better drainage, and the top part can have gravel and even more sand mixed into the soil, so the soil will drain well. Don’t forget to add compost to the soil mix in order to provide nutrients to the plants. When the spiral is done, spray it with water and let it settle. Plant your herbs, veggie crops, flowers and medicinal plants the next day.

What should I plant in it?

Most herbs prefer dry climate, but there is of course a variety of plants that can be grown in a garden spiral. Plants that need a lot of spacing (room between neighboring plants) should be avoided, as a spiral is better used when well crowded.  You should also choose plants you like, as it is useless to grow exotic plants if you’re not planning on using them. Also make sure that neighboring plants make good companions, referring to companion planting guides. Finally, take into account the final height of the herbs you want to plant, as this will affect how much shade they’ll provide to other herbs (which may be a good thing, or not).

To help you prepare your spiral, here’s a non exhaustive list of herbs and their preferred soil type. Note that you must look for their sunlight requirements yourself, an important characteristic to take into account when planning their final disposition on the spiral.

Straight lines? Pff! Amateurs!
Dry: Borage, Chamomile, Chicory, Cilantro, Cumin, Fennel, French marigold, Garlic chives, Hops, Hyssop, Lavender, Marjoram, Nasturtium, Oregano, Rosemary, Saffron, Sage, Sweet basil, Tansy, Tarragon.

In-between: Basil, Bergamot, Borage, Calendula, Catnip, Chamomile, Chives, Cilantro, Dandelion, Dill, Ginger, Lavender, Lemon grass, Sage, Spring onions, Parsley.

Moist: Chamomille, Comfrey, Lemon balm, Mint, Parsley, Watercress. 

Watering Tips: Because it's simple, yet not that much, though it's not so complicated, well it looks like it is at first, but it's not THAT hard to get the twist, you know


For the layperson, watering plants means pouring water over plants. Unfortunately, there’s much more to it and some inexperimented gardeners learn it the hard way.


Watering is done as needed, although more frequently for younger plants. As plants mature, mulched or not, their roots will be able to reach water deeper in the soil, and their foliage (with some exceptions) will shade the soil and reduce evaporation.

In general, mature crops need 1 to 3 inches of water per week, although water needs vary with the weather and the stage of growth of the plant (during fruit production, most crops will prefer to avoid drought and will need more water than usual in order to produce quality fruits). Therefore, it may not be necessary to water every day (containers may escape this rule, as they can’t hold as much water as the soil garden).

1. How can I know when it’s time to water?


An easy way to figure out if plants need water is to stick one’s finger in the soil, as deep as possible. For seedlings, stick your finger quite close to the plant; for mature plants, anywhere under the canopy should do. If the soil is moist or wet about 3 inches deep (i.e. if the soil is moist 3 inches deep and deeper, not if only moist 3 inches at the surface), big plants should do fine; for seedlings or maturing root crops, the soil should be moist at least 2 inches deep.

The same method can be used to know if one has watered enough. After watering, the soil should be wet at least as deep as one can reach with a finger. Be careful: the soil surface can look wet even though the water has only penetrated 1 inch deep in the soil. Shallow watering stimulates shallow rooting, which can make the difference between life and death for some crops during long drought events.

For soil gardens, you can also refer to this soil appearance table (which assumes you know what type of soil you have, which is something you should know anyway!).

The weather is also a good indicator. If it’s been hot and/or dry for the last few days, watering is probably needed. If it’s been quite cold and/or humid and/or rainy, watering may wait a few more days or more, depending on other conditions.

2. When should I water?


Watering in the morning provides plants with enough water to last through the day, which may prevent wilting or other ill effects of hot/dry weather. This also allows water to dry during the day, reducing risks of disease. Avoid watering in the middle of the day, as most of the water gets lost by evaporation. If watering at the end of the day, make sure that the plants will have time to dry before the night, otherwise they could develop fungal diseases.

3. Am I watering too much or not enough?


When overwatered, plants that elongate continuously, like tomato and squash, will favor stem and leaf production over fruit production.

All plants will also show signs of wilting if under or overwatered. Temporary wilting can occur on hot and dry days, but wilting caused by long-term under/overwatering will persist even after the plants have been watered and/or cooled.

Other symptoms of over or underwatering include curling leaves, yellowing leaves, falling leaves, falling flowers, etc. Evaluate the moisture of the soil (look or feel) to determine if the cause is overwatering (wet soil, maybe moss or mushrooms growing) or underwatering (dry soil, cracked or crusted).

If you overwatered, don’t water until the soil has dried enough (use the finger technique). Overwatering can carry nutrients in the soil deeper than the plants' root depth and cause nutrient deficiencies.

If you underwatered, make sure that you don’t stop watering when the surface of the soil looks wet: use your finger to make sure the water penetrates well into the soil. Underwatering causes shallow rooting. This makes plants weaker and more susceptible to drought as they can’t reach the water and nutrients available in deeper layers of soil.

4. How should I water?

As much as possible, try to water awkwardly.

Too much water pressure can cause the soil to compact and crust, which in turn will make it harder for water to penetrate the soil. Try to simulate a gentle rain by adjusting the pressure, angle, or height of the water source.

You also want to avoid adding too much water at the same time, which can cause run off (i.e. displacement of soil). This is especially important when watering small seedlings or where seeds have just been planted, as you may uproot the seedlings, displace the seeds, or bury them, which prevents proper germination and growth.


Cold water cools the plants, reducing transpiration and plant temperature (plants stop growing when it’s too hot). Ice-cold water may, on the other hand, shock the plant and not be of any help. Warm water can be used in early spring and late fall, since the soil is cooler at that time.

Treated water contains chlorine, which kills beneficial micro-organisms in the soil and may also repel macro-organisms (insects and worms, e.g.). If possible, let the water sit in an open container for 24h before watering, for chlorine to evaporate.


5. Avoid wetting the leaves

Wet leaves develop diseases easily, particularly fungal diseases and especially if they stay wet overnight. When watering, try to only wet the soil.


6. Mulch
Mulch has many benefits, including reducing water loss by evaporation. Many types of mulches can be used, the most common being straw (not hay, as it includes weed seeds), dead leaves, grass cuttings, and woodchips. Woodchips should only be used for trees, fruit bushes, perennials, and large, mature fruiting plants (e.g. tomato after flowering).

It is also possible to reduce the use of mulch by planting crops densely with similar crops or with companion plants, but this may not be possible at the seedling stage and can pose challenges for nutrient management. Mulching fast-growing crops with high demands in nitrogen is generally not recommended, as the decomposition of the mulch will reduce the amount of nitrogen available to the crop and slow its growth.


7. Supplementary tips for outdoors irrigation

For soil gardens, fill glass or plastic bottles with water and plant them upside down at the base of your plants (be careful not to damage the roots!). The water will seep slowly into the soil as the plants need it.

And try to have fun, like this person does... No. No, that's too much, actually. 

8. Watering and stage of growth

Plants are more sensitive to inadequate watering at some critical periods of development. If possible, according to the ‘rules’ of companion planting, those plants should be grouped together in the garden. For all crops, proper watering (no big fluctuations, no underwatering, no overwatering, no etc.) is essential during and 2-3 weeks before harvest, but some have other specific needs.

Vegetable: Critical period for water needs


Bean, lima: Pollination and pod development
Bean, snap: Pod enlargement
Broccoli: Head development
Cabbage Head: development
Carrot Root: enlargement
Cauliflower: Head development
Corn, sweet: Silking, tasseling, and ear development
Cucumber: Flowering and fruit development
Eggplant: Uniform supply from flowering through harvest
Melon: Fruit set and early development
Onion, dry: Bulb enlargement
Pea: Flowering and seed enlargement
Pepper: Uniform supply from flowering through harvest
Potato: Tuber set and tuber enlargement
Radish: Root enlargement
Squash: summer Bud development and flowering
Tomato: Uniform supply from flowering through harvest
Turnip: Root enlargement

Moisture fluctuation can also cause blossom end rot in tomatoes and fruit cracking in various fruits (including tomatoes) during fruit enlargement. 


You clearly don't want this in your garden. It's like... Shyamalan's The Happening, but worse. Well, you know what I mean...


Saturday, August 25, 2012


Hello all you fine August-enjoying folk!

For all those who weren't able to attend the sign-making + doc-watching event on August 19th, here's a recap of what happened and some photos for good measure!


Because of some pretty ridiculously unfortunate technical issues, the screening was not held outside in the garden but in someone's apartment (the important thing being that it still happen).  However, due to the oversight of a forgetful individual (ahem...me) the documentary we intended to screen (The Global Banquet: Politics of Food) was not shown, instead, we watched an episode from CBC's The Nature of Things (narrated by David Suzuki).  The theme was changes in modern agriculture in Canada, but was actually primarily about livestock production.  The script and tone of the doc made it clear that the target audience was not anyone with any background knowledge in agriculture or the food production industry as it is today.  Somewhat of an intellectual disappointment, however, there was lots of material for us to question and critique in or discussion after the doc.


The signs were made by painting black chalkboard paint onto small little plastic garden signs, then plant names were written with greasy "China" markers (if you were ever in a Bio/Chem lab you probably would have used these).  Interesting note, the "China" markers were actually made in Mexico...


The whole night was a lot of fun (let's not forget the delllliiiccccious vegan pizza and yummy blueberry pie...mmmm).  Thanks everyone who helped organize/attended the event!


I completely forgot motherwort was growing in the garden!
Supposed to be good for relieving muscle cramps, stress,
insomnia, preventing hemorrhages - the list goes on!
I spy with my little eye 3 little flies...
Awesome carrot sign cut from garbage-scavenged,
crappy IKEA faux-wood table.  Haven't you always
wanted to know what you would look like with the
body of a carrot? Once we get it set up in the
garden, you'll be able to find out!


Hopefully we'll be putting on another crafts/screening event once the school year gets underway - we'll let you know! :) 

Wednesday, August 15, 2012

Garden Sign-Making & Outdoor Film Screening!

Campus Crops is hosting a free evening of craftsy and film-watching fun times, Sunday August 19th @ 7:30pm!

To start off, we'll be making some artsy plant signs (all materials will be provided). You can help us make some for our garden or make some for your own plants at home!

Afterwards, we're going to be screening The Global Banquet: Politics of Food in our garden. The documentary "explores the politics that threaten global food security, and demonstrates
the destructive aspects of the corporate globalization of food".

Also, we'll have some home-made vegan pizza for you to snack on, made with some of our garden-fresh veg! (Potluck items would also be greatly appreciated!)

Everyone is welcome! Feel free to drop by whenever - for one or both activities!

When: Sunday, August 19th
Sign-Making @ 7:30pm
Film Screening @ 9pm
(film is approx. 50mins.)
Where: Garden behind 3534 University St.
Cost: FREE! Potluck items appreciated!

Hope to see you there!
Campus Crops