 |
| This is 'modest'. You should be modest too. |
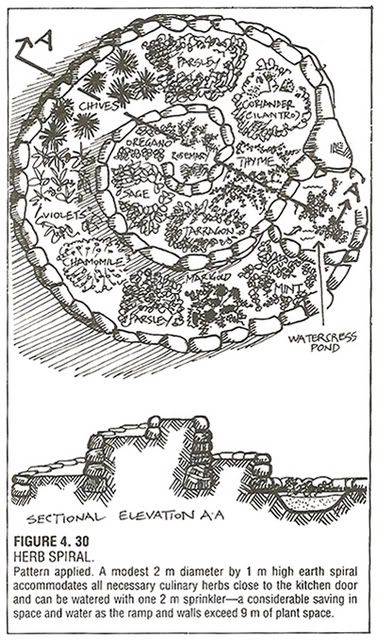
A herb spiral is a design that makes use of gravity
and sun position in order to create multiple ‘microclimates’ that can suit
different types of herbs (or vegetable crops or flowers or medicinal plants or
all of them, you decide) in a limited space. When water is poured at the top of
the spiral, it drains down to the lower layers, creating a dry and sunny
habitat at the top, a shady (or not, your choice) and humid zone at the bottom,
and different degrees of habitats relative to sun exposure and height between
those two extremes. It is normally built out of rocks, bricks or even glass
bottles filled with earth that form the structure and retain heat absorbed
during the day, reducing drastic temperature variations that could damage
fragile herbs.
Aside from it to be compact and versatile, a
great advantage of the herb spiral is its suitability for companion planting. This
allows an easier integrated pest management, as pest repellant or predator-attracting
plants that couldn’t be planted nearby in a level garden because of their
different needs can now thrive close to each other. A herb spiral also eases
water management, as plants preferring dry soil will be planted where the soil
dries quickly, plants that like well-drained soil will live in a soil that will
drain nicely even after a big rain, and plants that can grow in wet soil will
rarely lack moisture.
How you do it
To build a spiral, first choose a site, about
one or two meters wide (or smaller, if you want a small spiral, but this will
limit the range of microclimates). It doesn’t matter if it’s on the soil or on
a hard surface like concrete or asphalt. The site should receive plenty of
sunlight in order to keep Mediterranean herbs (oregon, sage, rosemary, e.g.)
happy. Avoid places where water tends to form puddles. If you can find a sunny
spot close to the kitchen, it’s even better, as you won’t forget to take care
of your spiral and will not be distracted on your way to your spiral (or back
to your kitchen).
When you’ve found the right spot, start by
laying cardboard and/or B&W newspapers on the ground. This will keep weeds
from growing in your spiral. Then, mark the spiral. It can be circular or elliptic;
that’s up to you. In order to make sure the microclimates will be in an ideal
situation, it’s better to place the bottom end of the spiral towards the North,
so the humid zones are the shadiest and do not lose too much water through
evaporation.
 |
| Remember to clean the bottles beforehand. Plants have some difficulty tolerating 'certain' substances. |
Follow by outlining the shape of your spiral
with the building materials you chose. You can build the walls to their full
height and fill the spiral afterward, or you can fill it gradually while you
raise the walls. For a typical 3 foot high spiral to have a nice slope, its
center should be 3 feet off the ground. Cap the bottom end of the spiral with a
rock in order to avoid run off, unless you want to make a pond at the bottom.
Some people infill the spiral with straw that
they’ll let turn into compost, but most people prefer putting gravel to build
the slope, adding the soil at the end, with sand or geotextile between both. Gravel makes a solid base and ensures
good drainage, avoiding collapse and waterlogging. Different soil mixes can be
added in the spiral to enhance the effect of the microclimates. For examples,
the lowest part can be filled with topsoil and compost, making a rich soil that
will keep water, the middle zone can be two parts soil and one part sand, for
better drainage, and the top part can have gravel and even more sand mixed into
the soil, so the soil will drain well. Don’t forget to add compost to the soil
mix in order to provide nutrients to the plants. When the spiral is done, spray
it with water and let it settle. Plant your herbs, veggie crops, flowers and
medicinal plants the next day.
What should I plant
in it?
Most herbs prefer dry climate, but there is of
course a variety of plants that can be grown in a garden spiral. Plants that
need a lot of spacing (room between neighboring plants) should be avoided, as a
spiral is better used when well crowded.
You should also choose plants you like, as it is useless to grow exotic
plants if you’re not planning on using them. Also make sure that neighboring
plants make good companions, referring to companion planting guides. Finally, take
into account the final height of the herbs you want to plant, as this will
affect how much shade they’ll provide to other herbs (which may be a good thing,
or not).
To help you prepare your spiral, here’s a non
exhaustive list of herbs and their preferred soil type. Note that you must look
for their sunlight requirements yourself, an important characteristic to take
into account when planning their final disposition on the spiral.
 |
| Straight lines? Pff! Amateurs! |
Dry: Borage, Chamomile, Chicory, Cilantro, Cumin,
Fennel, French marigold, Garlic chives, Hops, Hyssop, Lavender, Marjoram, Nasturtium,
Oregano, Rosemary, Saffron, Sage, Sweet basil, Tansy, Tarragon.
In-between: Basil, Bergamot, Borage, Calendula, Catnip, Chamomile,
Chives, Cilantro, Dandelion, Dill, Ginger, Lavender, Lemon grass, Sage, Spring
onions, Parsley.
Moist: Chamomille, Comfrey, Lemon balm, Mint, Parsley,
Watercress.
No comments:
Post a Comment